How to Configure Proxy Settings for Android?

How to Configure Proxy Settings for Android?

Learn how to configure the Android proxy settings on your phone or tablet.

When you use a proxy, all your connections go through it before reaching websites and apps. Proxies can help you hide your IP address, change your device’s location to unblock content, and more. It’s also possible for malware to enable proxies without your knowledge and consent.

This article will show you how to configure the Android proxy settings to set up or disable a proxy server on your Android device. 

How to Configure Android Proxy Settings?

Step 1. Go to the Settings app and select Wifi & Internet.


Step 2. Find your Wi-Fi network. If you’re currently connected to it, it should be the topmost option.


Step 3. Select the Gear icon on the right side and tap Modify. This will open a preferences popup. If you can’t see the Gear icon, touch and hold the network name and tap Modify network.


Step 4. In the popup, tap on Advanced options to extend the menu. You’ll see the Proxy dropdown. Expand it.


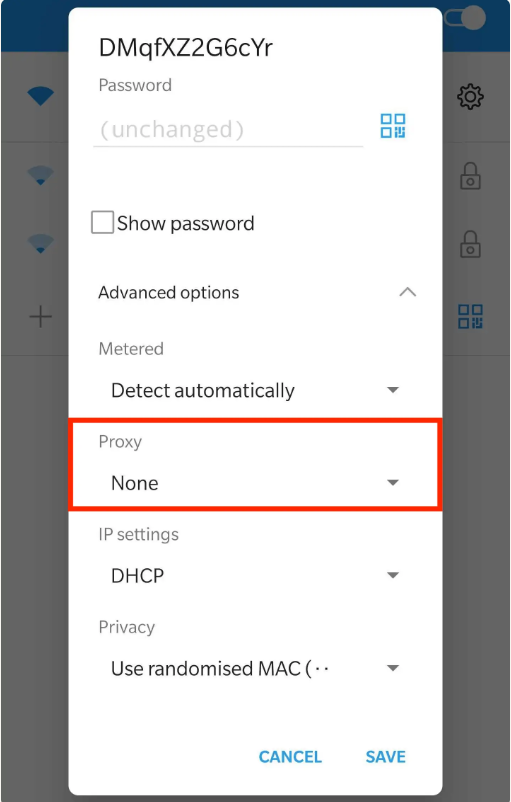
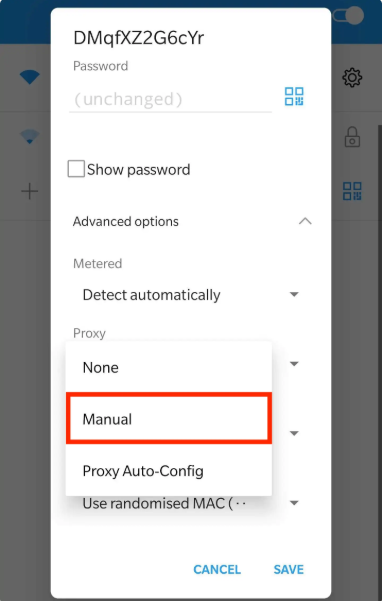
Step 5. In the dropdown, select Manual.

This means that you’ll enter your proxy server’s settings by yourself.

If you’re using a proxy at school or work, your network administrator might give you a PAC file to configure the settings automatically. Commercial proxy providers rarely do that.

Step 6. Enter your proxy server’s information.

 
Proxy hostname requires a proxy server’s hostname. You’ll have a hostname if you use backconnect proxies (so, residential or rotating IPs). Otherwise, you can enter a proxy IP address.
  • Example of an IP: 127.168.0.1
  • Example of a hostname: en.proxyprovider.net
Proxy port asks you to enter the numbers that come after the IP or hostname. They will be separated by a colon.
  • Example of a port: en.proxyprovider.net:10000
Step 7. Authenticate your proxies. Unlike iOS, Android devices don’t have fields for authenticating the proxy server in the settings. Instead, you’ll be asked to authenticate when you open your web browser. There, simply enter your credentials: username and password. If you’ve authenticated by whitelisting your IP address, you don’t need to enter the credentials.